WC3 World Editor: Tutorial 1
In this tutorial, we'll create a simple 1v1 multiplayer map, just to
make sure we understand the process. A future tutorial will focus on
some of the options available when creating a map.

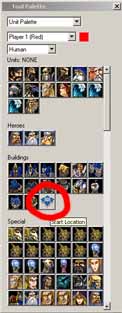
Start Location tool
|

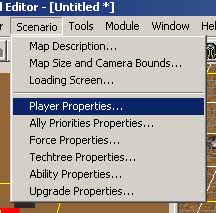
Scenario menu
|
- Open up the world editor; make sure your wc3 disc is in the drive.
- Go to the Scenario menu and select "Map description..."; fill in the
info in this dialog. Note that the other two options in the top half of
the Scenario menu go to the other two tabs in the dialog that pops up.
For now, the other two tabs are not relevant; explore if you want, but
I'll get to them in a later tutorial. Once you have finished filling
out the info in the Map Description dialog, hit the OK button.
- Go to the Scenario menu and select "Player properties...". As with
the Map Description option, the bottom six menu items bring up the same
tabbed dialog, but open to different pages. In the Player Properties
dialog, change the Controller for Player 2 to 'User.' You can leave the
race alone; in a normal multiplayer map, the user will be able to change
this. Dismiss the dialog by hitting the OK button.
-
If the Tool Palette window is not open, choose the 'Units' option
from the Layer window. Make sure Player 1 is selected in the second (middle)
popup at the top of the window. Click on the last icon in Buildings section,
which has the tooltip "Start Location."
- Place the start location where you want it. If you decide that you want
to move the location around and you still have the start location tool
selected, you can just click again. To move your view around the map, you
can either click in the minimap in the upper-left of the window, or hold
down the right mouse button and drag the playfield around.
If you mess up at any point, you can drop the item that you are
'carrying' by pressing the escape key. To select an item in the playfield,
drag-select a box around it. To start moving the start location around
again, click on one of the polygons that makes up the spinning, spiked
ring, and drag the start around.
- Once you have the first start location where you want it,
select 'Player 2' in the Tool Palette window. You should still have the
start location tool selected, and it should have changed from red (or
whatever player 1's color was) to blue. Click in the map to place the
second start location.
- Go back to the tool palette, and choose 'Neutral Passive' from the
second popup.
The first item in the list of Buildings is a gold mine. Place a gold mine
near each start location. There should be three squares between the hall
and the gold mine, and the mine should preferably be at a diagonal to the
town hall (rather than directly above or beside the hall). Double-click
on the gold mine to change its value from the default $12,500.
- Switch to the Doodads layer. Select Tree Wall from the list of items,
and place liberally.
- Save the file. Run WC3; select Single Player->Custom Game, browse to
the map you saved, choose a computer for your opponent, and give it a
spin.
home
| map guide
| strategies
| replays
| editor tutorials
Clan Burning Blade
send me email
© Copyright 2002 by Andrew R. Southwick. All rights reserved.


